Can the Auto-Peel Function on K39 Thermal Label Printer Be Turned Off?

Can the Auto-Peel Function on K39 Thermal Label Printer Be Turned Off?

For businesses that print labels, the auto-peel function is a double-edged sword: it saves time when you need to stick labels immediately (e.g., shipping packages one by one), but it can be a hassle when you want to print a batch of labels first and apply them later (e.g., inventory tags for a warehouse). A top question we get about our K39 thermal label printer is: “Can the auto-peel function be turned off?” As a 10+ year foreign trade factory specializing in thermal printers, we’re here to give a clear, actionable answer: Yes, the K39’s auto-peel function can be turned off—and it’s done manually when you load the label paper. You simply choose “auto-peel” or “no peel” mode during setup.


This manual selection design isn’t an afterthought; it’s tailored to fit how real businesses work—adapting to both one-by-one and batch labeling needs. Let’s break down how the auto-peel function works, how to switch it on/off, and why this flexibility makes the K39 a reliable choice for diverse labeling tasks.

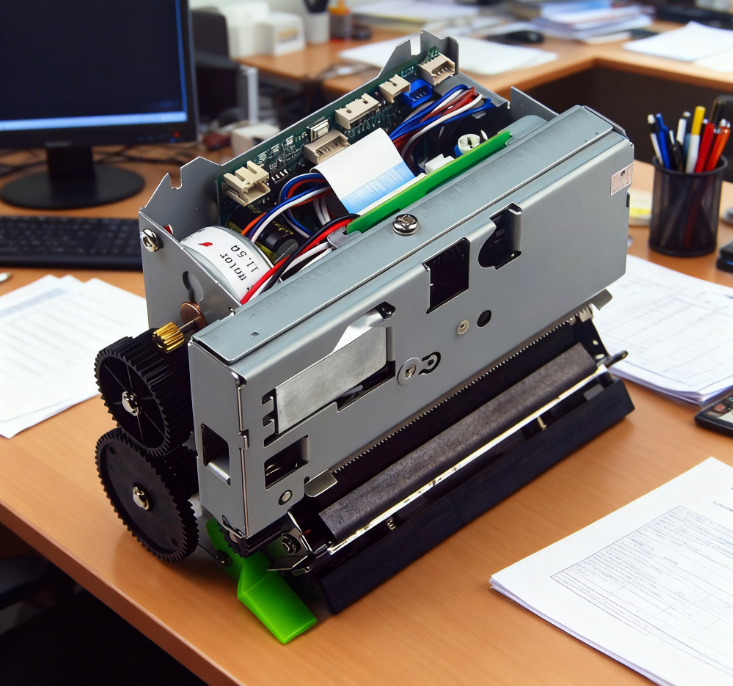
1. First: What Is the K39’s Auto-Peel Function?

Before we dive into turning it off, let’s clarify what the auto-peel function does—so you understand when to use (or avoid) it:
The K39’s auto-peel feature automatically separates the printed label from its backing paper as it prints. When enabled, each label pops out ready to stick—no need to manually peel it off the roll. This is a game-changer for:


  • Shipping departments: Staff printing one shipping label at a time and applying it to packages immediately.
  • Retail stores: Employees labeling products on the spot (e.g., price tags for new inventory).
  • Field service: Technicians printing equipment labels and sticking them to devices right away.


Without auto-peel, the printed labels stay attached to the backing paper—you collect the roll of printed labels and peel them off later. This is better for batch work, like printing 50 inventory tags to apply across a warehouse at once.

2. How to Turn Off Auto-Peel: Simple Manual Selection When Loading Paper

The K39’s auto-peel on/off switch is intuitive—no complex menus or coding. You set the mode when you load the label paper—here’s the step-by-step process:

Step 1: Open the K39’s Paper Compartment

Lift the top cover of the K39 (it clicks open easily, no tools needed) to access the paper roll area. Inside, you’ll see a small, labeled lever or dial (marked “Auto Peel” and “No Peel”)—this is the mode selector.

Step 2: Adjust the Mode Selector

  • To use auto-peel: Slide the lever/dial to the “Auto Peel” position. The K39 will now separate labels from their backing as it prints.
  • To turn off auto-peel: Slide the lever/dial to the “No Peel” (or “Continuous”) position. The printer will print labels without peeling them—they’ll stay attached to the backing paper, rolling out as a single strip.

Step 3: Load the Label Paper (and Confirm)

Place your label roll into the compartment, thread the paper through the guide, and close the cover. The K39 will run a quick test print to confirm the mode—if you chose “No Peel,” the test label will stay on the backing paper; if “Auto Peel,” it will peel off automatically.


That’s it—no extra steps. You can switch modes anytime you reload the paper, so you can go from batch printing to one-by-one labeling in seconds.

3. Why Manual Selection Is Better Than a “One-Click” Digital Switch

You might wonder: “Why not use a digital switch in the software?” We chose manual selection during paper loading for two key reasons—practicality and reliability:

It Forces You to Match Mode to Your Task

When you adjust the lever while loading paper, you’re prompted to think about how you’ll use the labels that day. This prevents accidental mode mismatches (e.g., forgetting to turn off auto-peel before printing a batch, leading to labels scattered across your desk).

It’s More Reliable for Long-Term Use

Digital switches can glitch (e.g., software bugs, power outages resetting settings). The K39’s physical lever is mechanical—no software dependencies, so it works consistently even after years of use. We test every K39’s mode selector to withstand 10,000+ adjustments—perfect for busy warehouses or shipping departments that reload paper multiple times a day.

4. Ideal Scenarios for “Auto Peel” vs. “No Peel” Mode

To help you decide when to switch modes, here are the most common use cases for each:


Mode Best For Why It Works
Auto Peel One-by-one labeling (shipping, retail) Saves time—labels are ready to stick immediately, no manual peeling.
No Peel Batch labeling (inventory, bulk products) Prevents lost labels—all printed labels stay on the roll until you’re ready to apply them.

5. Why Trust the K39 From a 10-Year Foreign Trade Factory?

When you choose the K39, you’re not just getting a label printer—you’re getting a tool built for real-world durability and flexibility:


  • Global Compatibility: The K39 works with standard label sizes (20mm–80mm width) and is CE, FCC, RoHS certified—usable in Europe, the US, Asia, and beyond.
  • Free Support: If you’re unsure how to adjust the mode, our 24/7 English-speaking team can help via email or video call—we’ll walk you through loading paper and setting the mode.
  • Durable Design: The paper compartment and mode selector are made of industrial-grade plastic, so they hold up to daily use (no broken levers or stuck dials).


The K39’s auto-peel function is designed to work for you—not against you. Whether you need to peel labels one by one or print a batch to apply later, the manual selection during paper loading lets you switch modes in seconds.


Ready to try the K39 for your labeling tasks? Contact our team to request a sample print (we’ll show you both auto-peel and no-peel modes in action), ask about compatible label paper, or get a tailored quote. We’re here to help you streamline your labeling workflow.

Related Posts

QR31 Thermal Printer: Stand Included, No 3D Drawings Provided!

When setting up a thermal printer like the QR31, small but critical details—like whether a stand is included or if 3D drawings are available—can...
Post by pengmike
Sep 17 2025

The 802 thermal printer supports Arabic but with partial language coverage; however, its graphic printing function works seamlessly worldwide.

For our global clients—especially those operating in the Middle East, North Africa, or other Arabic-speaking regions—a common question about the 802 thermal printer is: “Does...
Post by pengmike
Sep 16 2025

802 Thermal Printer USB Cable: How Long Is the Standard One? Can We Make It 2m?

When setting up a thermal printer, the length of the USB cable might seem like a small detail—but it directly impacts how you arrange...
Post by pengmike
Sep 12 2025

Add Your Customer’s Logo to Receipts Yes, Huangsheng Electronics Printers Support It!

For businesses like cafes, retail stores, or service shops, adding a customer’s logo to receipts isn’t just a “nice-to-have”—it’s a way to boost brand...
Post by pengmike
Sep 11 2025

How to Connect HS-802 Thermal Printer to iPad?

For businesses using iPads for mobile workflows—like retail staff ringing up customers on the sales floor, café servers taking tableside orders, or event staff...
Post by pengmike
Sep 10 2025

QR71 Thermal Printer: Dual Power Voltages (1.5-9V / 12V) – Your Questions Answered

When setting up a thermal printer, one of the most critical (and often overlooked) details is matching the right power voltage. Using the wrong...
Post by pengmike
Sep 09 2025

Can the 2054TA Thermal Printer print on uneven-surfaced cotton fabric?

In the world of thermal printing, one of the most common questions we get from clients—especially those in apparel, crafts, or textile industries—is: “Can the...
Post by pengmike
Sep 08 2025